Ein Webex-Meeting ist eine Funktion, für die ein zusätzliches externes Konto sowie dessen Konfiguration im Manager für externe Dienstanbieter erforderlich sind. Webex-Meetings dienen der Durchführung von Audio- und Videokonferenzen in Echtzeit.
Bei der Erstellung eines Meetings müssen mindestens ein Webex-Konto sowie Uhrzeit und Datum ausgewählt werden.
Der Sitzungsleiter muss die Besprechung über eine der Webex-Anwendungen (Website, Desktop-App, mobile App) starten, damit die Teilnehmer der Besprechung beitreten können.
Um Webex-Komponenten im Kurslehrplan anzuzeigen, stellen, muss die Einstellung „Gesperrte Komponenten anzeigen“ im Kursraumtyp aktiviert sein (Kursraumtyp/Lehrplan/Layoutoptionen/Gesperrte Komponenten anzeigen).
Integration von Webex
Modulbeschreibung
Die Webex-Integration ermöglicht die nahtlose Einbindung von Webex Meetings in imc Learning Suite. Diese Integration soll die Einrichtung, Nutzung und Verwaltung von Online-Meetings vereinfachen, um die Online-Interaktion im Rahmen des Kurses so einfach wie möglich zu gestalten.
Funktionen
-
Webex-Meetings können direkt über das LMS eingerichtet und verwaltet werden
-
Benachrichtigungen über das Treffen können per E-Mail mit Kalendereintrag an die Lernenden gesendet werden
-
Die Teilnehmer können nahtlos an der Besprechung teilnehmen
-
aus ihrem Lehrplan, ohne dass weitere Nachweise erforderlich sind
-
über einen Meeting-Link in einer E-Mail als Webex-Gastnutzer
-
-
Unterstützung von Webex-Besprechungsvorlagen, einschließlich
-
Sitzungen in separaten Räumen
-
Zuweisen eines Co-Moderator oder pro Vorlage mehrere Co-Moderatoren (Webex-Assistenztrainer)
-
-
Einrichtung von parallelen Sitzungen
-
Erfassung der Teilnahmezeit und Festlegung des Teilnehmerstatus (bestanden/nicht bestanden) auf der Grundlage eines frei wählbaren Prozentsatzes
-
Bericht über das Treffen
Zweck
Webex-Meetings in das LMS integrieren.
Vorteile
imc Learning Suite-Kunden können die weit verbreitete Online-Konferenzlösung Webex direkt im LMS nutzen. Die Erstellung von Kursen, die Terminplanung und der Start von Besprechungen lassen sich nahtlos innerhalb des Ökosystems der imc Learning Suite durchführen.
Anwendungsfälle / Szenarien
-
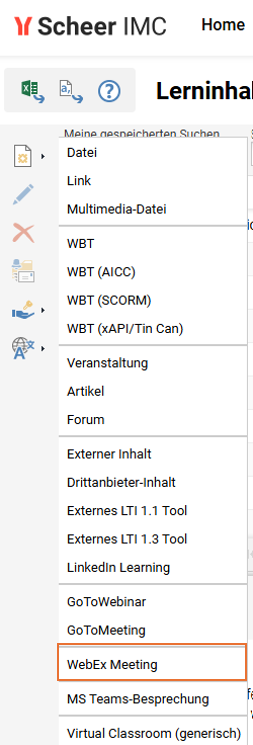
Webex-Besprechung in iLS erstellen
-
Lerninhaltetyp für WebEx-Meetings erstellen und bearbeiten
-
Lerninhaltetyp mit der Option „WebEx-Besprechung“ erstellen
WebEx Meeting erstellen über Lerninhaltetypen
-
Namen (erforderlich), die Beschreibung und weitere Angaben auf der Registerkarte „Beschreibung“ des Lerninhaltetyp eintragen
-
Auf der Registerkarte „Meta-Tags und Attribute“ (siehe Screenshot unten) Meta-Tags und Attribute für Lerninhaltetyp und Lerninhalt hinzufügen, löschen oder konfigurieren und die Sichtbarkeit festlegen (Allgemein/Kursraum), z. B.:
-
Übernommen von (ID 11832): Ermöglicht die Angabe eines ganzzahligen Prozentsatzes zur Festlegung einer Bedingung für das Bestehen oder Nichtbestehen bei der Erfassung der Teilnahme an Besprechungen
-
Status „Bestanden“: wenn das Ergebnis >= dem festgelegten Prozentsatz entspricht ODER der Meta-Tag „Bestanden von“ den Wert 0 hat, leer ist oder gar nicht vorhanden ist
-
Status „Fehlgeschlagen“: wenn das Ergebnis unter dem festgelegten Prozentsatz liegt
-
-
Webex-Link (ID 11829): Ermöglicht die Anzeige und gemeinsame Nutzung eines Webex-Meetings, z. B. im Kursraum
-
Vertrauliche/nicht relevante Informationen wie der Hostschlüssel sollten auf „Nicht anzeigen“ gesetzt werden
-
iCalendar – Informationen: Die Auswahl unter „Allgemeine Sichtbarkeit“ bestimmt, ob die Informationen im iCal-Objekt für den Kalendereintrag der Besprechung angezeigt werden. Auf diese Weise wird die Sichtbarkeit des Webex-Meeting-Links kann für die iCal-Nachricht konfiguriert werden.
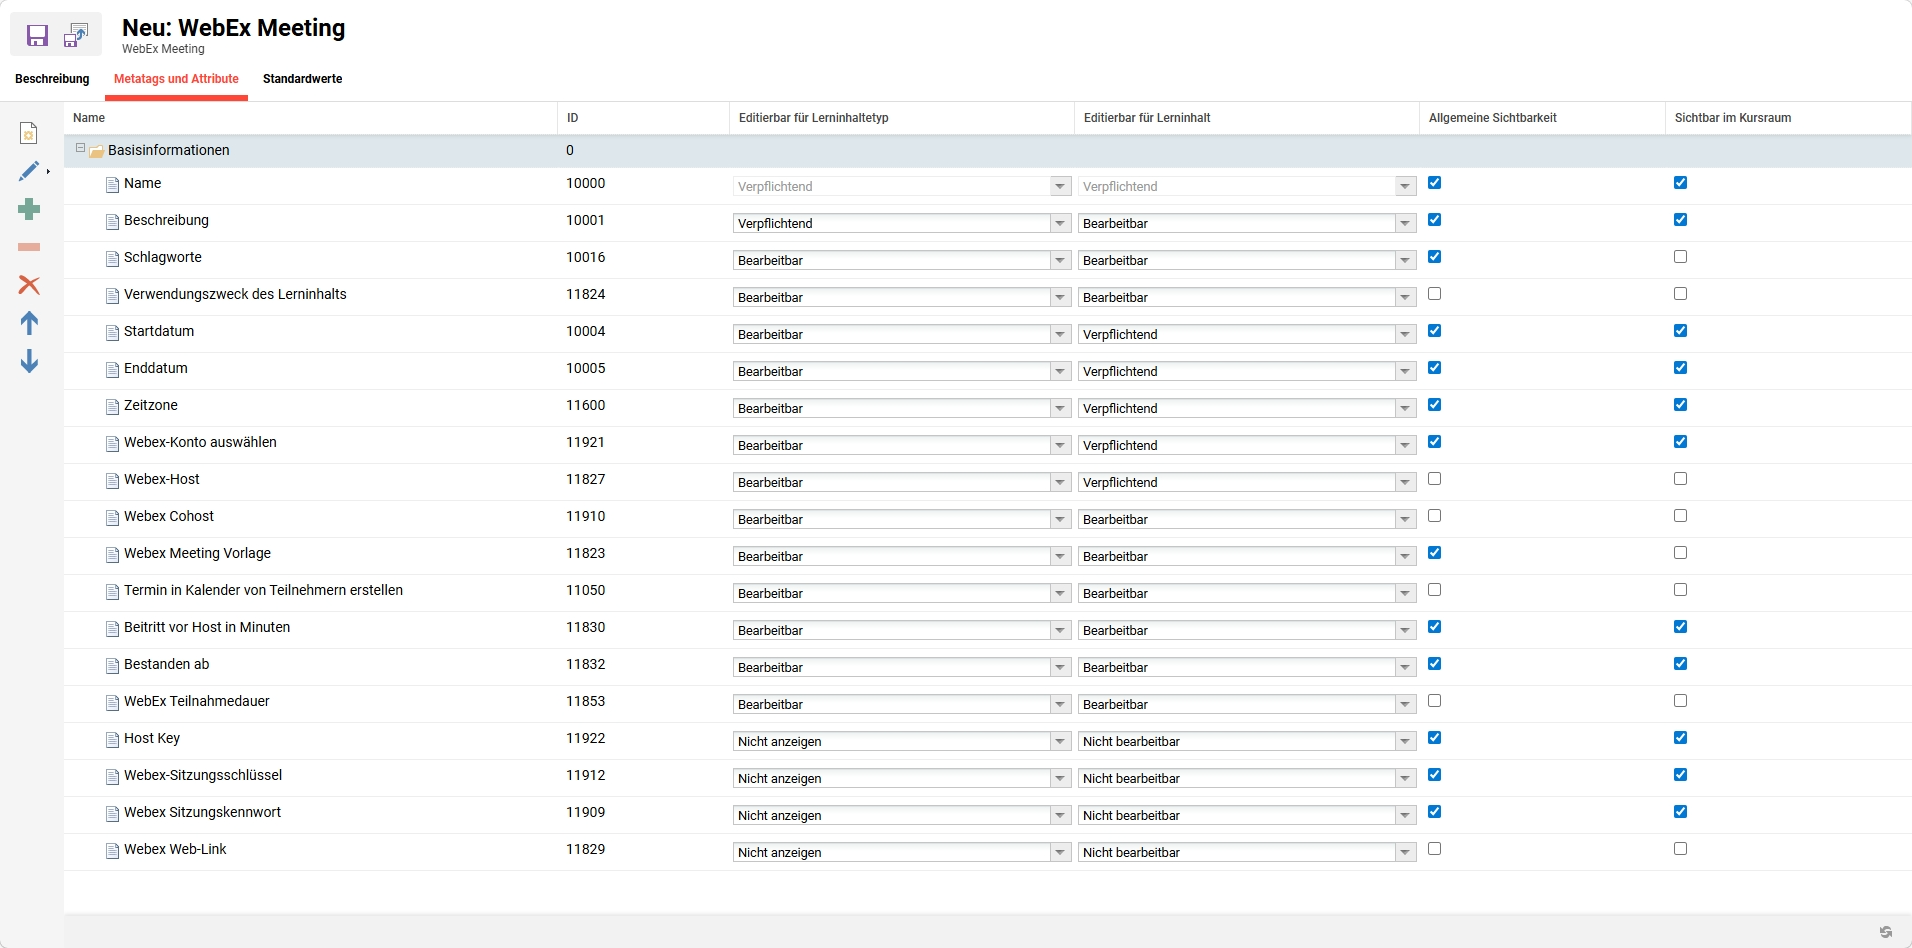
WebEx Meeting - Metatags und Attribute
-
-
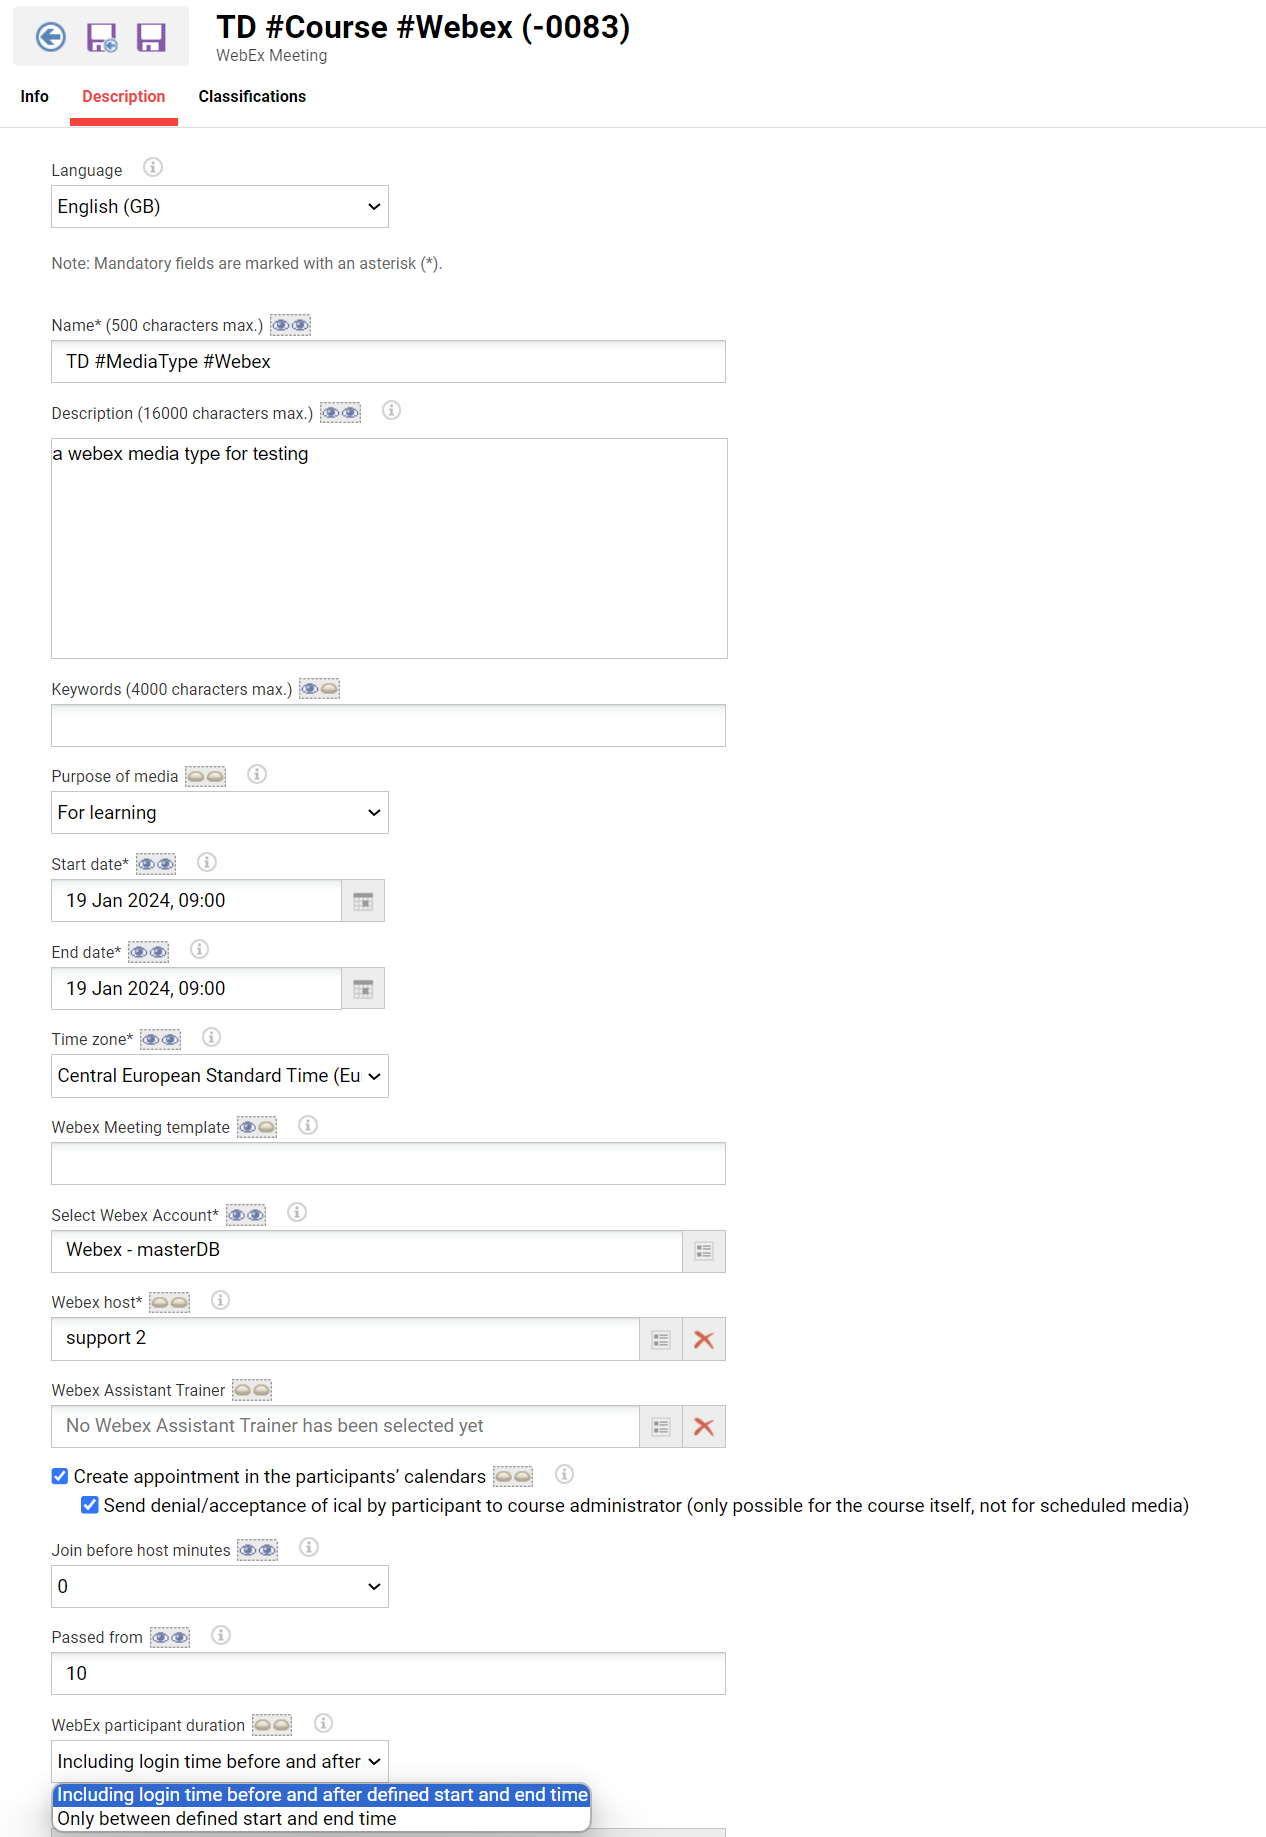
Standardwerte auf der entsprechenden Registerkarte festlegen:
-
Name und Beschreibung des Webex-Meetings (erforderlich)
-
Webex-Besprechungsvorlage: Name der Webex-Besprechungsvorlage, der manuell eingegeben werden muss
-
Es dürfen nur Standardvorlagen ausgewählt werden; benutzerdefinierte Vorlagen funktionieren nicht.
-
Bitte achten Sie darauf, den genauen Namen der Vorlage zu verwenden
-
In der Vorlage können mehrere Mitveranstalter zugewiesen werden
-
-
Webex-Konto: LMS-Benutzer, der Mitglied der Gruppe „WebexOrganizer“ ist (siehe Erläuterung zu externen Dienstanbietern) und über Administrator- (Host-)Rechte bei Webex verfügt
-
Webex-Host: Muss zudem über Administrator- (Host-)Rechte in Webex verfügen und kann eine andere Person als der Inhaber des Webex-Kontos sein; muss Mitglied der Gruppe „WebexOrganizer“ sein.
-
Der Webex-Host muss sich vom Co-Host unterscheiden; die Auswahl desselben Benutzers ist nicht möglich
-
Die Mitglieder der Webex-Organisatorengruppe, die nicht über die erforderlichen Rechte auf dem Webex-Server verfügen, werden im Suchfilter zur Auswahl der Webex-Hosts nicht angezeigt!
-
-
Co-Moderator (früher Webex-Assistenztrainer): Muss über Co-Moderatorenrechte in Webex verfügen und außerdem Mitglied der Gruppe „Webex Organizer“ sein
-
Der Co-Host muss sich vom Webex-Host unterscheiden; die Auswahl desselben Benutzers ist nicht möglich
-
Mitglieder der Webex-Organizer-Gruppe, die nicht über die erforderlichen Rechte auf dem Webex-Server verfügen, werden im Suchfilter nicht angezeigt!
-
-
Ermöglichen der Erstellung eines Termins in den Kalendern der Teilnehmer, der ausgewählt wird, wenn die Anmeldung bei Webex-Meetings von außerhalb des im Learning Suite erlaubt ist
-
Die Einstellung „Vor Beginn der Sitzung beitreten“ entspricht der entsprechenden Einstellung in Webex und kann durch die entsprechende Einstellung in der Webex-Vorlage überschrieben werden
-
Das Feld „Bestanden bei (erforderliche Teilnahmezeit am Meeting als Prozentwert)“ muss ausgefüllt werden, wenn der Status des Teilnehmers und der Webex-Komponente automatisch auf „Bestanden“/„Abgeschlossen“ gesetzt werden soll, sofern der Teilnehmer die erforderliche Zeit im Webex-Meeting verbringt.
-
Es muss ein Cronjob namens „WebexParticipantAttendancePortfolioUpdate“ eingerichtet und regelmäßig oder manuell ausgeführt werden, um die Teilnahme-Daten abzurufen
-
-
Teilnahmedauer bei Webex: Option zur Erfassung der Besprechungsdauer
-
einschließlich der Anmeldezeit vor und nach der festgelegten Start- und Endzeit
-
nur zwischen einer festgelegten Start- und Endzeit
-
-
-
-
Ein Webex-Lerninhlat im Lerinhalte-Manager erstellen, über das auch das Webex-Meeting gestartet werden kann
-
Erstellen einer kursspezifische (empfohlen) oder eine globale Kurskomponente.
-
-
Webex-Besprechung starten/beitreten
-
Als Moderator/Co-Moderator:
Auf diee grüne Schaltfläche „Teilnehmen“ in der von Webex erstellten Einladungs-E-Mail klicken, die Webanwendung oder die mobile/Desktop-App starten, oder auf das grüne „Play“-Symbol in der linken Menüleiste der Kursanleitung tippen (ein Start über das Backend ist nicht erforderlich) -
Als Tutor:
Durch Anklicken des grünen „Play“-Symbols in der linken Menüleiste der Kursanleitung (muss nicht unbedingt gestartet werden, um die Anwesenheit der Teilnehmer zu erfassen)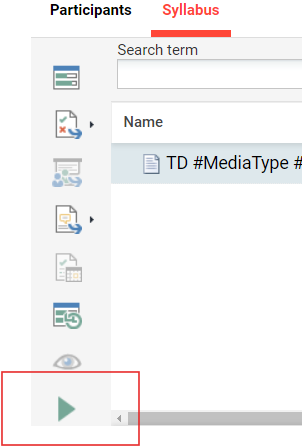
-
Als Benutzer
Klicken Sie im LMS auf die Kachel der Kurskomponente im Lehrplan, um über einen direkten Link zur Besprechung zu gelangen, ohne den Namen oder das Passwort eingeben zu müssen. Eine weitere Möglichkeit, auf Webex-Meetings zuzugreifen, ist die Verwendung der WebEx-Browseranwendung, der WebEx-App oder eines Webex-Meeting-Links.
-
-
Anwesenheit erfassen und Teilnehmerstatus prüfen
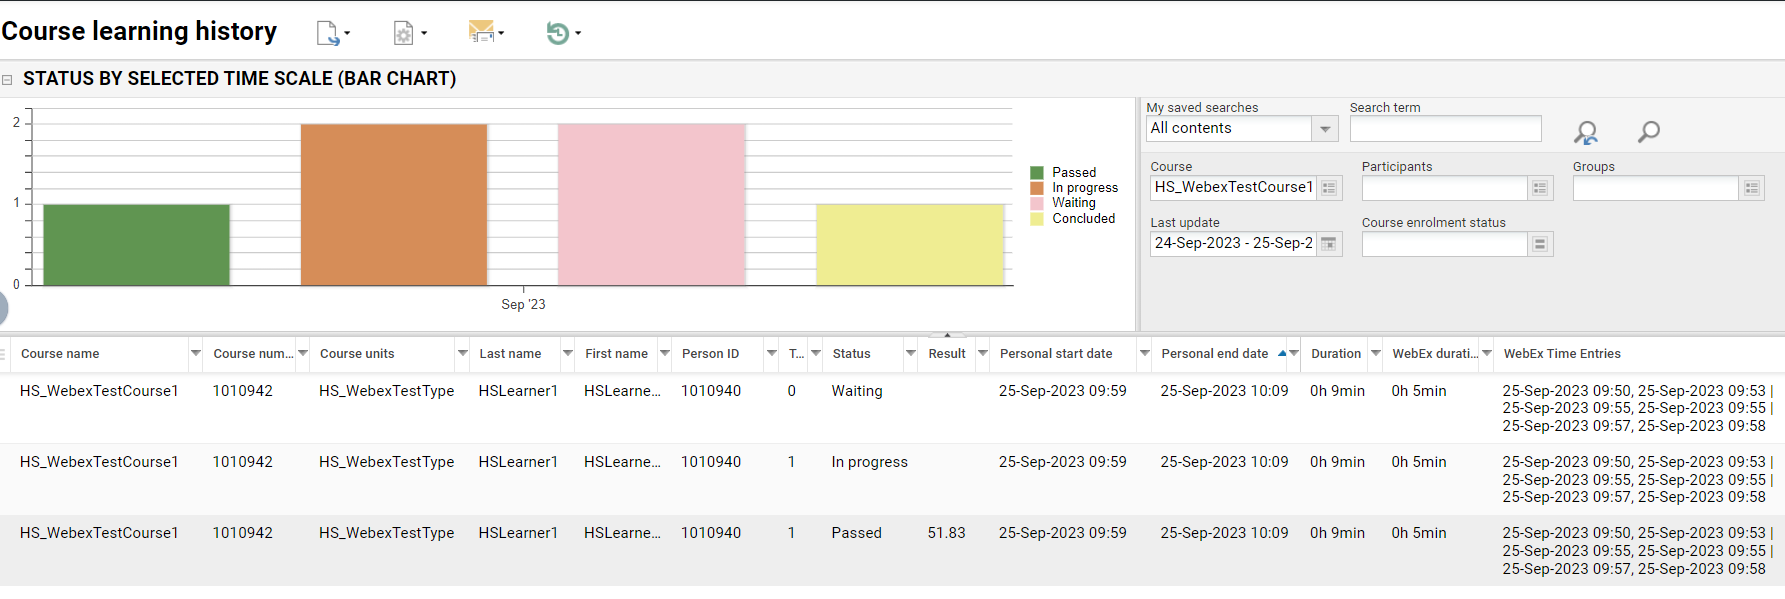
Der Status der Teilnehmer wird korrekt angezeigt (nicht bestanden, bestanden), abhängig von der Gesamtzeit, die in Prozent im WebEx-Lerninhaltetyp/Lerninhalt/Komponente (Meta-Tag „Bestanden von“) für die Teilnehmer der Besprechung definiert ist. Der Cronjob „WebexParticipantAttendancePortfolioUpdate“ muss eingerichtet und regelmäßig oder manuell ausgeführt werden, um die Teilnahme-Daten vom Webex-Server abzurufen. Die Teilnahme-Daten können 10–30 Minuten nach Beendigung des Meetings abgerufen werden. Da die E-Mail-Adresse des Teilnehmers mit den E-Mail-Adressen der Webex-Meeting-Teilnehmer abgeglichen wird, muss diese beim Start des Meetings korrekt eingegeben werden.-
Statusänderung einer Webex-Komponente im Lehrplan
Wenn der Teilnehmer die erforderliche Zeit in der Besprechung verbracht hat, wechselt das Symbol auf der Webex-Komponente zu grün. Auch bei der Teilnahme an einer Webex-Besprechung als Gast ohne LMS-Anmeldung erfolgt diese Statusänderung.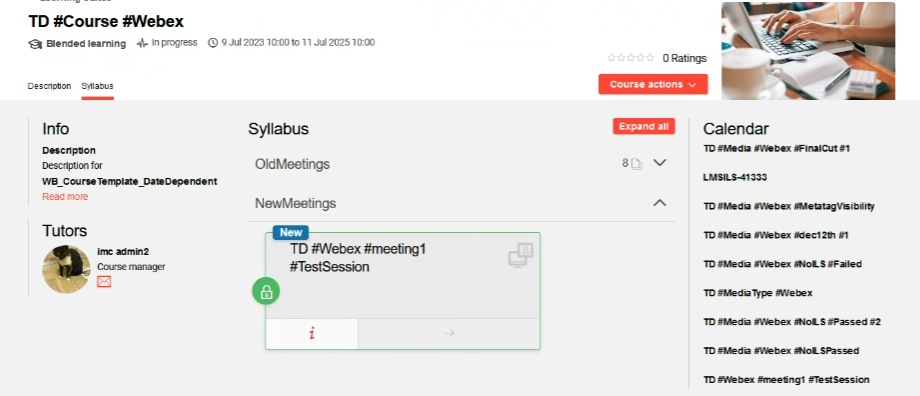
-
Bericht zur Kurshistorie (Komponentenstatus)
-
Status „Bestanden“: wenn das Ergebnis >= dem festgelegten Prozentsatz entspricht ODER der Meta-Tag „Bestanden von“ den Wert 0 hat, leer ist oder gar nicht vorhanden ist
-
Status „Fehlgeschlagen“: wenn das Ergebnis unter dem festgelegten Prozentsatz liegt
-
-
Kursunterricht
-
Teilnehmeransicht
-
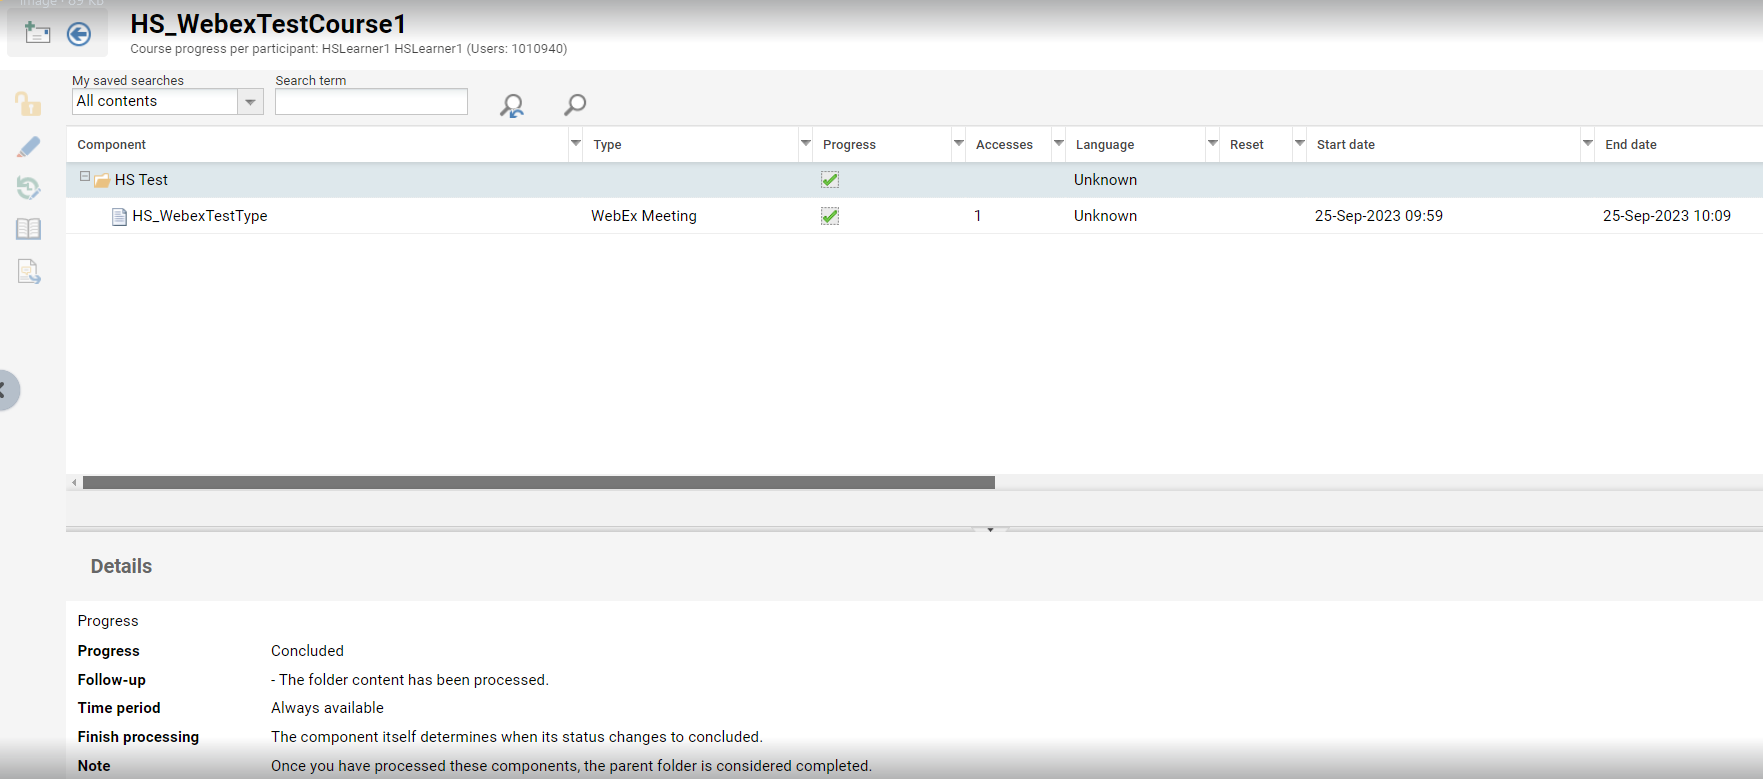
Der Status „abgeschlossen“ wird angezeigt: bei den Status „erfolgreich verarbeitet“ und „fertig“ (grünes Häkchen im Auswahlfeld)
-
Status „fehlgeschlagen“: oder kein Fortschritt bei Status „fehlgeschlagen“ (rotes Kreuz oder kein Status, wenn noch nicht gestartet)
-
-
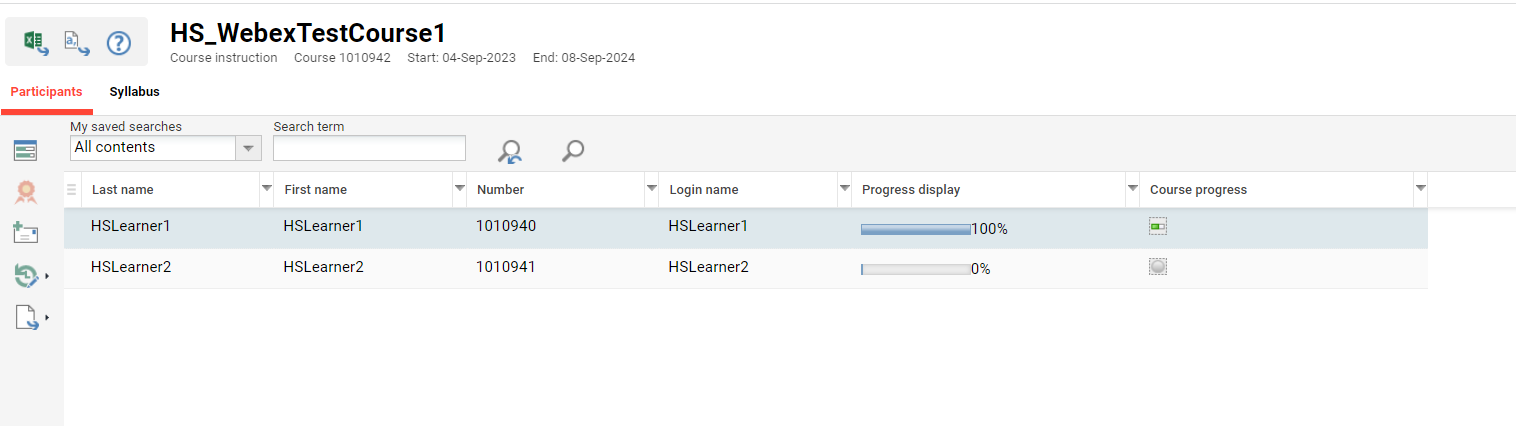
Kursfortschritt pro Teilnehmer (Kurskomponente)
-
Der Status „abgeschlossen“ wird angezeigt (grüner Haken im Auswahlfeld), wenn der Status des Lernenden „bestanden“ lautet.
-
Status „nicht bestanden“ (rotes Kreuz), wenn der Status des Lernenden „Nicht bestanden“ lautet
-
Kein Status: kein Symbol
-
-
Anwesenheitserfassung
Das LMS stellt die Tabelle zur Anwesenheitserfassung (siehe Screenshot) im Menü „Kursmanager“ der oberen Navigationsleiste bereit. Sie zeigt den Status der Kurskomponenten der Lernenden an, der je nach Status der Lernenden auf „bestanden“ oder „nicht bestanden“ gesetzt werden kann. Entsprechend diesem Status können der Tutor oder der Kursadministrator den Kursstatus entsprechend ändern. Der Cronjob „WebexParticipantAttendancePortfolioUpdate“ muss eingerichtet und regelmäßig oder manuell ausgeführt werden, um die Teilnahme-Daten vom Webex-Server abzurufen. Die Teilnahme-Daten können 10 bis 30 Minuten nach Beendigung des Meetings abgerufen werden.
Hinweis: Der Menüpunkt „Anwesenheitserfassung“ muss für den Tutor oder Kursadministrator als sichtbar eingestellt sein, und es müssen die Berechtigungen zum Ändern des Kursstatus und des Status von Kurskomponenten erteilt werden.
-
-
-
Verwendung von Webex-Besprechungsvorlagen
Beim Erstellen eines Webex-Meetings im LMS können vordefinierte Webex-Meeting-Vorlagen auf dem Webex-Server (nur Standardvorlagen) angewendet werden, um Einstellungen beim Erstellen von Webex-Meetings wiederzuverwenden.
In einem Lerninhalt- und Lerninhaltetyp kann der Name der Webex-Besprechungsvorlage eingegeben werden, und die in der Vorlage definierten Einstellungen werden auf die zu erstellende Besprechung angewendet (siehe Screenshot unten).
Hinweis: Der Name der Vorlage muss manuell eingegeben werden (es wird empfohlen, ihn aus Webex zu kopieren und einzufügen)

Nur Standardvorlagen für Besprechungen kann über die REST-API genutzt werden; persönliche Vorlagen (siehe „Meine Vorlagen“ im Screenshot unten) können vom Website-Administrator in Standardvorlagen geändert werden.

-
Mehrere Moderatoren (wird nur durch Hinzufügen einer Besprechungsvorlage unterstützt)
-
In der Besprechungsvorlage können mehrere Co-Moderatoren hinzugefügt werden. Sie werden dem Co-Moderator (Webex-Assistent) hinzugefügt, der im Lerninhalt/Lerninhaltetyp angegeben ist, sofern dieser definiert ist.
-
-
Parallele Sitzungen anlegen
Ab Version 14.17.1 können parallele Sitzungen angelegt werden.
a) Es sind Multi-Host-Lizenzen auf der Webex-Seite erforderlich!
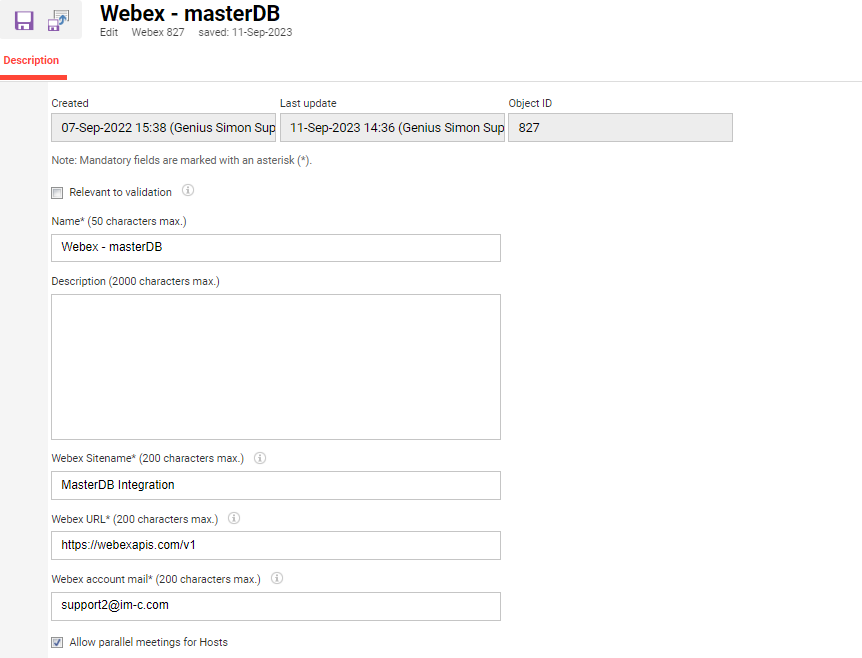
b) Das Kontrollkästchen „Parallele Besprechungen für den Gastgeber zulassen“ unter „Externer Service Anbieter“ muss aktiviert sein (siehe Abbildung unten).
-
Überprüfung durch den Gastgeber/Mitveranstalter (Option zur Überprüfung durch den Administrator)
Wenn das in IP 22 eingeführte Kontrollkästchen (siehe Screenshot oben) in den Einstellungen für externe Service Anbieter aktiviert ist, werden in den entsprechenden Suchfiltern für die Auswahl von Gastgebern und Co-Gastgebern nur diejenigen Mitglieder der Gruppe „WebExOrganizer“ angezeigt, die berechtigt sind (siehe Tabelle unten):
|
Teilnahmeberechtigung |
Gastgeber |
Co-Moderator |
|
Rollen (auf dem WebEx-Server) |
Vollständige Administratorrechte |
Vollständiger Administrator oder Administrator mit Lesezugriff oder Benutzer und Geräteadministrator |
|
Lizenzen (auf dem WebEx-Server) |
Webex Meetings Suite |
Webex Meetings Suite |
|
Host auswählen. Anmelden (im LMS) |
|
Wenn ein Benutzer als Gastgeber ausgewählt wurde, darf er nicht in der Liste der Co-Gastgeber aufgeführt sein |
Ohne die Konfiguration der WebEx-Integration mit den erforderlichen Admin-API-Berechtigungen kann diese Funktion nicht genutzt werden.
Um die Host-/Co-Host-Prüfung nutzen zu können, muss der folgende Admin-API-Bereich der WebEx-Integration gewährt werden:
· Einen Benutzer anlegen
· Lizenznutzung einer Organisation anzeigen
· Verfügbare Rollen einer Organisation anzeigen
Wenn die WebEx-Integration mit den oben genannten Admin-API-Berechtigungen nicht eingerichtet werden kann, muss diese Funktion zur Überprüfung von Gastgebern und Co-Gastgebern deaktiviert werden. Zudem würde die Fehlermeldung, die angezeigt wird, wenn ein zuvor ausgewählter und gespeicherter Gastgeber oder Co-Gastgeber nicht über die erforderlichen Rechte bei WebEx verfügt, nicht erscheinen, da auch diese auf die Admin-API zurückgreift.
Weitere Informationen zu den WebEx-Rollen finden Sie hier: