Im Folgenden finden Sie die Anleitungen zur Konfiguration der MS Exchange-APIs und zur Erstellung der Anwendung im Azure Active Directory. Der Konfigurationsprozess ist in folgende Abschnitte unterteilt:
-
Erstellung eines neuen Kontos im Azure-Portal sowie Schritte zur Registrierung einer neuen Anwendung.
-
Hinzufügen von Berechtigungen zur registrierten Anwendung.
-
Konfiguration der Backend-Anwendung zusammen mit Postman- und Swagger-Dokument zur Verwendung von APIs.
Es ist wichtig zu beachten, dass bestimmte Konfigurationen innerhalb des Azure-Portals Probleme verursachen oder bestimmte Funktionen dieses Dienstes beeinträchtigen können. Es ist wichtig zu betonen, dass dieses Dokument keine Konfigurationsschritte oder Informationen für solche Ausnahmefälle bereitstellen kann.
Voraussetzungen / Einschränkungen
imc Learning Suite
-
Die Funktion ist an das lizenzierte Add-on „Resource Management“ in der imc Learning Suite gebunden.
-
Die Backend- und Frontend-URL müssen in den Eigenschaften der Konfiguration konfiguriert werden.
-
Einrichtung nur für den Ressourcentyp „Lokalität“ verfügbar.
-
Die Ressource „Lokalität/Raum” muss manuell in der imc Learning Suite mit einem externen Identifikator konfiguriert werden, der den Besprechungsraum gegenüber allen anderen Räumen in MS Exchange identifiziert.
-
Es wird nur die Buchung unterstützt, eine Vorbuchung/Vorplanung ist für externe Ressourcen nicht verfügbar.
-
Es ist nicht möglich, mehrere Buchungen für denselben Raum im selben Zeitintervall vorzunehmen.
-
Ausfallzeiten und Checklisten-Funktionen sind für externe Ressourcen nicht möglich.
-
Für Kursvorlagen können keine externen Ressourcen hinzugefügt werden.
-
Im Ressourcenkalender kann die Verfügbarkeit externer Ressourcen für maximal 1 Monat überprüft werden.
Vorteile
Azure/MS Exchange
-
Der Dienst „Externer Connector für Ressourcen“ muss konfiguriert werden, um Teil des Lieferpakets zu sein
-
Ein Teams-Mandant ist erforderlich (in der Regel in einem Office 365-Abonnement/Mandanten enthalten).
-
Es muss ein technischer Nutzer/eine technische App erstellt werden, um mit bestimmten Berechtigungen auf die Microsoft Graph API zugreifen zu können.
-
Der automatische Import verfügbarer Räume aus dem Active Directory in die imc Learning Suite wird nicht unterstützt. Dies muss manuell erfolgen.
-
Externe Ressourcen sind nur für datumsabhängige Kurse verfügbar, da dies eine Einschränkung von MS Exchange beim Beantragen der Verfügbarkeit von Ressourcen ist.
-
Das maximale Zeitintervall für die Überprüfung eines Raums beträgt 1 Monat. Dies ist eine Einschränkung von MS Exchange.
Funktionen im Überblick
-
Räume als Ressourcen können in der Ressourcenverwaltung in der imc Learning Suite aus MS Exchange ausgewählt werden.
-
Der Status der Verfügbarkeit der Räume wird vom Veranstalter bereitgestellt und umgekehrt übertragen.
-
Erstellen Sie mehrere externe Anbieter vom Typ „Ressourcenkonto“ und stellen Sie in einem mandantenfähigen System, in dem Nutzer zu verschiedenen Mandanten gehören, sicher, dass diese unterschiedliche Exchange-Installationen verwenden können.
Vorkonfiguration
Erstellung des technischen Nutzers / der technischen App
Systemanforderungen
Anwendung / Webserver
|
Produkt |
Version |
|---|---|
|
Tomcat |
9 |
Technologie-Stack
Die folgende Tabelle enthält eine Liste der Technologien, die zur Implementierung von MS Exchange verwendet werden.
|
Name |
Version |
|---|---|
|
Java |
17,0 |
|
Spring Boot |
2.7.11 |
|
Gradle |
7.6.1 |
|
Microsoft Graph SDK |
5.30 |
|
Junit |
4.12 |
|
Lombok |
1.18.10 |
|
Azure-Identity |
1.2.5 |
Integrationsschritte
Neue Anwendung buchen auf Azure-Portal.
Um eine neue Anwendung über das Azure-Portal zu registrieren, führen Sie die folgenden Schritte aus:
-
Melden Sie sich mit einem Arbeits- oder Schulkonto oder einem persönlichen Microsoft-Konto beim Azure-Portal an.
-
Wenn das Konto Zugriff auf mehr als einen Mandanten gewährt, wählen Sie das Konto in der oberen rechten Ecke aus und stellen Sie die Portalsitzung auf den gewünschten Azure AD-Mandanten ein.
-
Wählen Sie im linken Navigationsbereich den Dienst „Azure Active Directory“ aus und wählen Sie dann „App-Registrierungen“ > „Neue Registrierung“.
-
Wenn die Seite „Anwendung registrieren“ angezeigt wird, geben Sie die Buchungsdaten der Anwendung ein:
-
Name – Geben Sie einen aussagekräftigen Anwendungsnamen ein, der den Nutzern der App angezeigt wird.
-
Unterstützte Accounttypen – Wählen Sie aus, welche Accounts die Anwendung unterstützen soll.
-
|
Unterstützte Accounttypen |
Beschreibung |
|---|---|
|
Nur Accounts in diesem Organisational Directory |
Wählen Sie diese Option, wenn Sie eine Branchenanwendung (LOB) erstellen. Diese Option ist nicht verfügbar, wenn die Anwendung nicht in einem Verzeichnis registriert ist. Diese Option ist nur für Azure AD Single Tenant verfügbar. Dies ist die Standardoption, sofern die App nicht außerhalb eines Verzeichnisses registriert wird. In Fällen, in denen die App außerhalb eines Verzeichnisses registriert wird, sind Azure AD Multi-Tenant und persönliche Microsoft-Accounts die Standardeinstellung. |
|
Accounts in einem beliebigen Organisational Directory |
Wählen Sie diese Option, wenn Sie alle Geschäfts- und Bildungskunden ansprechen möchten. Diese Option ist nur für Azure AD Multi-Tenant verfügbar. Wenn die App nur als Azure AD-Einzelmandanten-App gebucht ist, kann sie über die Registerkarte „Authentifizierung“ auf Azure AD-Mehrmandanten-App aktualisiert und wieder auf Einzelmandanten-App zurückgesetzt werden. |
|
Accounts in beliebigen Organisational Directories und persönliche Microsoft-Accounts |
Wählen Sie diese Option, um die breiteste Kundengruppe anzusprechen. Diese Option wird Azure AD Multi-Tenant- und persönlichen Microsoft-Konten zugeordnet. Wenn die App als Azure AD Multi-Tenant- und persönliches Microsoft-Account gebucht ist, kann dies nicht in der Benutzeroberfläche geändert werden. Stattdessen muss der Anwendungsmanifest-Editor verwendet werden, um die unterstützten Accounttypen zu ändern. |
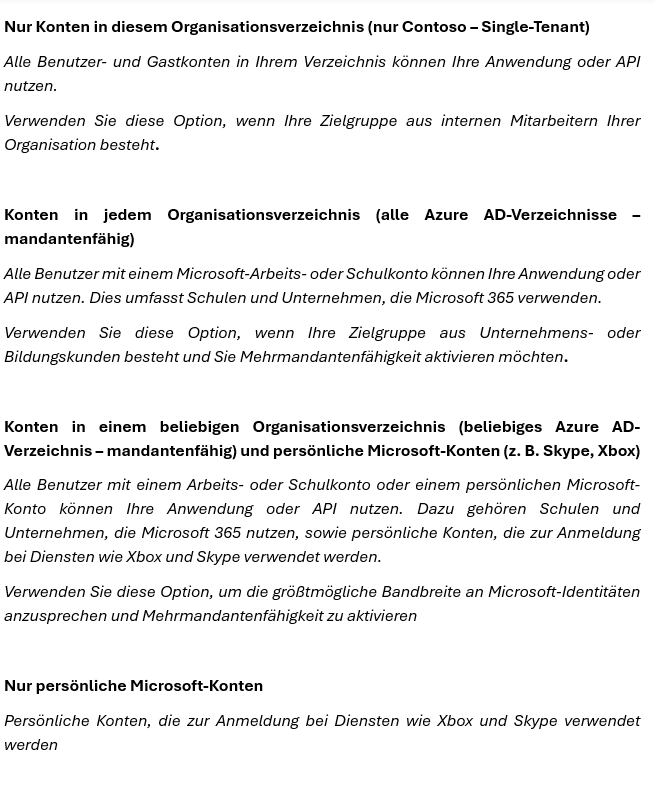
Redirect-URI (optional) – Wählen Sie den Typ der zu erstellenden App aus (Web oder öffentlicher Client (Mobilgerät und Desktop)) und geben Sie dann die Redirect-URI (oder Antwort-URL) für die Anwendung ein. Diese Option ist optional und kann übersprungen werden.
Wenn Sie fertig sind, wählen Sie Buchen.
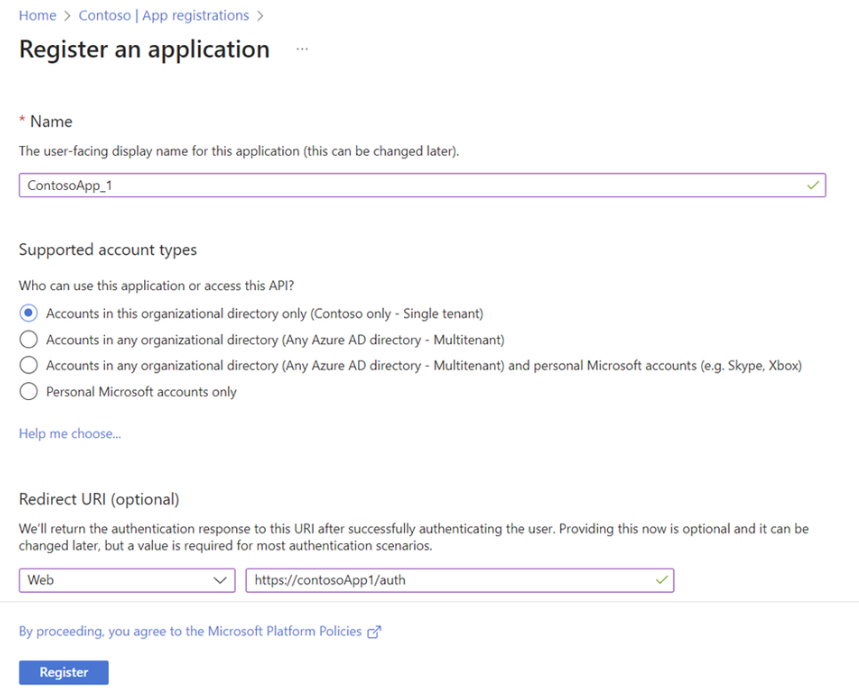
Azure AD weist der App eine eindeutige Anwendungs-ID (Client-ID) zu, und der Nutzer wird zur Übersichtsseite der Anwendung weitergeleitet. Um der Anwendung zusätzliche Funktionen hinzuzufügen, wählen Sie weitere Optionen für die Konfiguration aus, darunter Branding, Zertifikate und Secrets, API-Berechtigungen und mehr.
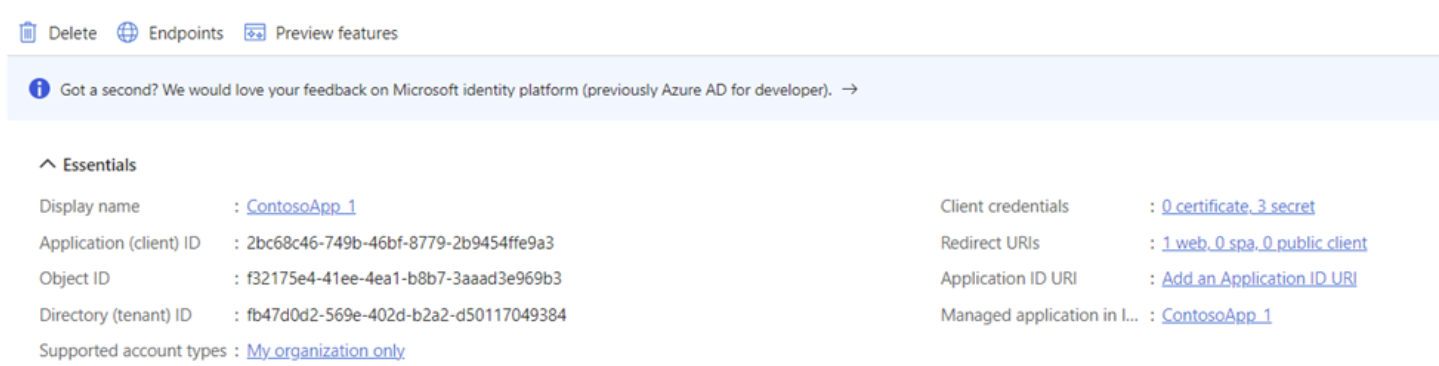
Hinzufügen von Berechtigungen zu registrierten Anwendungen
Berechtigungen sind unerlässlich, um bestimmte Funktionen innerhalb der registrierten Anwendung zu aktivieren. Diese Berechtigungen gewähren die erforderlichen Zugriffsrechte, um verschiedene Aktionen auszuführen, damit die registrierte Anwendung Kalenderereignisse erstellen, abrufen, aktualisieren und löschen kann.
Um Berechtigungen hinzuzufügen, führen Sie die folgenden Schritte aus:
-
Wählen Sie im linken Navigationsbereich die Option Azure Active Directory Dienst und wählen Sie dann App-Registrierungen. Dadurch werden alle registrierten Anwendungen aufgelistet. Wählen Sie nun die neu registrierte Anwendung aus. Dadurch werden Sie zur Übersichtsseite der Anwendung weitergeleitet.
-
Wählen Sie im linken Navigationsbereich API-Berechtigungen.
-
Klicken Sie auf Eine Berechtigung hinzufügen Button und führen Sie eine Zuweisung der App durch Anwendung Level und Zustimmung der Verwaltung erteilen:
|
Funktionalität |
Privilegien |
Beschreibung |
|
Calendars.ReadWrite |
Erstellt eine Veranstaltung, um die Ressource als für eine Buchung vorgesehen zu markieren. |
|
|
Calendars.Read (†) |
Gibt eine Liste der Nutzer-Veranstaltungen zurück. |
|
|
Calendars.ReadWrite |
Eine Veranstaltung aus der Kalenderanzeige des Nutzers löschen |
|
|
Calendars.ReadWrite |
Aktualisiert eine bestehende Veranstaltung aus der Kalenderanzeige des Nutzers. |
Hinweis: Die Berechtigung ist nicht erforderlich, wenn die Berechtigung „Calendars.ReadWrite“ bereits erteilt wurde, da „Calendards.Read“ in der Berechtigung „Calendards.ReadWrite“ enthalten ist.
Dies ist eine Zusammenstellung aller vom Dienst verwendeten APIs aus dem Microsoft Graph, zusammen mit den entsprechenden notwendigen Berechtigungen für den Aufruf jeder API. In Fällen, in denen bestimmte Funktionen als unnötig erachtet werden oder bestimmte Berechtigungen nicht erteilt werden können, wird empfohlen, diese Liste zu Rate zu ziehen.
Wir empfehlen dringend, alle notwendigen Berechtigungen zu erteilen, um alle Funktionen des Dienstes nutzen zu können.
Anmeldeinformationen
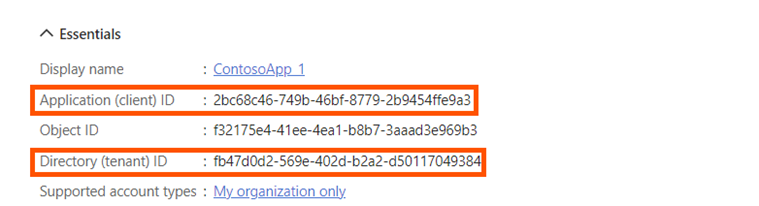
Nach erfolgreicher Erstellung einer neuen Anwendung wird dieser automatisch eine eindeutige Anwendungs-ID (Mandant-ID) zugewiesen. Diese ID ist entscheidend für die Identifizierung der spezifischen Anwendung und des Mandanten (der Organisation), an die Anfragen gesendet werden sollen.
Es gibt drei Werte, die zur Authentifizierung jeder Anfrage vom Dienst an Microsoft verwendet werden. Diese sind:
-
Application (Client) ID
-
Tenant ID
-
Client Secret (value)
Die Werte für die Client-ID und die Mandanten-ID können direkt auf der Übersichtsseite der Anwendungen eingesehen werden:
Anfangs ist den Anwendungen kein Secret zugewiesen, daher muss eines erstellt werden. Um ein neues Client-Secret zu generieren, klicken Sie im linken Menü der Einstellungen der Anwendung auf „Certificates & Secrets“.

Beim Hinzufügen eines neuen geheimen Werts ist es unerlässlich, eine kurze Beschreibung seines Zwecks anzugeben und ein angemessenes Ablaufdatum festzulegen, da Secret nicht dauerhaft sein können. Wir empfehlen, die maximale Gültigkeitsdauer des Secrets auf zwei Jahre festzulegen.
Das Ablaufdatum für das Secret kann aus den folgenden Optionen ausgewählt werden. Es ist jedoch zu beachten, dass eine kürzere Gültigkeitsdauer häufigere Aktualisierungen auf der Seite der Externen Service Anbieter erforderlich macht.
Konfiguration
Aktivieren Sie die Lizenz für Ressourcen und Kapazitäten.
Die Servicelizenz muss vom Scheer imc-Business-Berater aktiviert werden und kann dann vom Administrator innerhalb der imc Learning Suite konfiguriert werden. Derzeit erfolgt die Konfiguration unter „Benutzerdefinierte Parameter“ und wird in einen separaten Konfigurationsbereich im Konfigurationsmanager verschoben.
Externe Service Anbieter
Nachdem die Lizenz aktiviert wurde, erstellen Sie ein neues „Ressourcenkonto”. Dies ist möglich über die Externe Service Anbieter Manager, durch Auswahl von Ressourcenkonto:
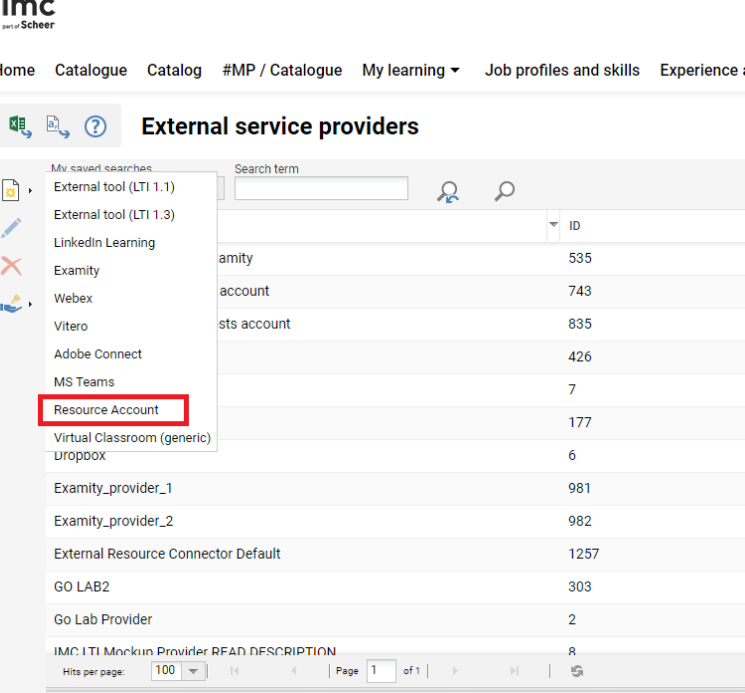
Das System ermöglicht es dem Administrator, mehrere externe Anbieter vom Typ „Ressourcen Account“ anzulegen. Dadurch wird sichergestellt, dass in einem mandantenfähigen System Nutzer, die zu verschiedenen Mandanten gehören, unterschiedliche MS Exchange-Installationen verwenden können.
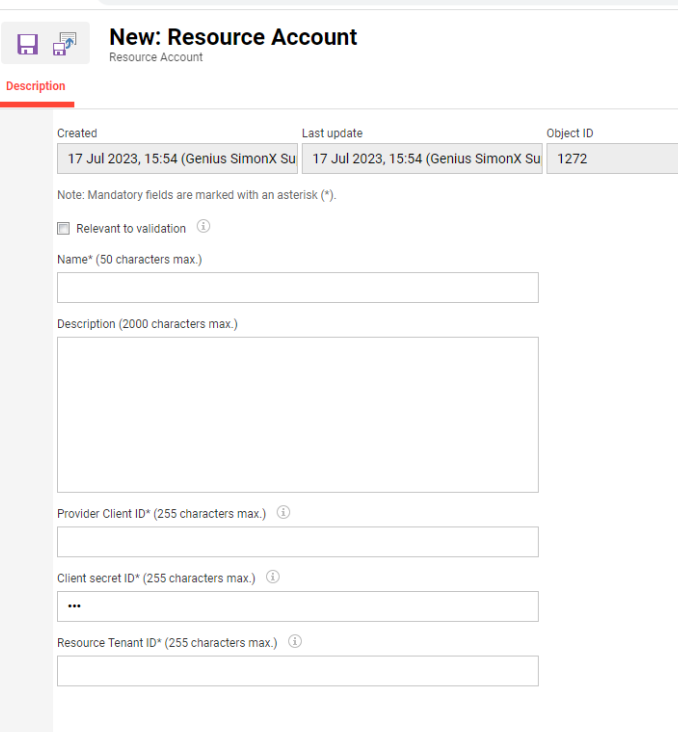
Die externen Service Anbieter für MS Exchange benötigen eine Client-ID, einen geheimen Client-ID und eine Mandanten-ID, die über die Azure Active Directory-Einrichtung abgerufen werden müssen (siehe Anwendungsanmeldeinformationen).
Ressourcenkonfiguration
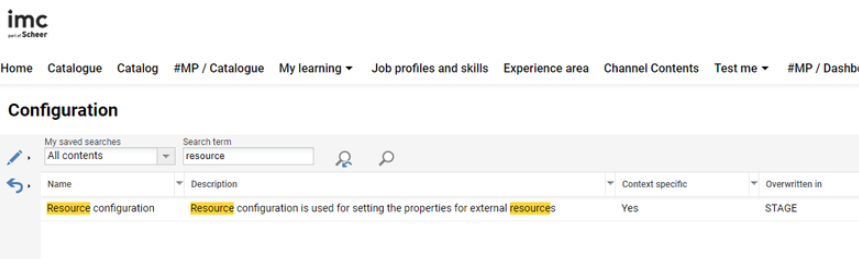
Nachdem die Lizenz aktiviert wurde, suchen Sie die folgende Konfiguration: Ressourcen-Konfiguration in Konfigurationsmanager.
Bearbeiten Sie diese Konfiguration bei Bedarf. Überprüfen das Externe Ressourcen aktivieren Aktivieren Sie die Checkbox, um die Konfiguration der externen Ressource zu aktivieren, und fügen Sie die URL des externen Ressourcenkonnektors hinzu.

Die detaillierte Erläuterung der Parameter finden Sie in der folgenden Tabelle:
|
Parameter |
Beschreibung |
Beispielwert |
|
Externe Ressourcen aktivieren |
Dient zum allgemeinen Aktivieren oder Deaktivieren der Integration. |
True |
|
Ressourcendienst EndPoint |
API-Endpunkt für den Zugriff auf Ressourcen, einschließlich externer Domäne |
|
|
Externe Service Anbieter |
der externe Service Anbieter für die Authentifizierung und Verbindung mit der Microsoft Graph API |
Hier ist nur der externe Dienst „Ressourcen.Account“ zu sehen. |
Erstellen und Konfigurieren eines externen Ressourcentyps
Nachdem die Konfiguration eingerichtet ist, müssen wir eine externe Ressource erstellen, die mit der von Exchange bereitgestellten Ressource verknüpft ist. Zu diesem Zweck werden folgende Elemente verwendet:
-
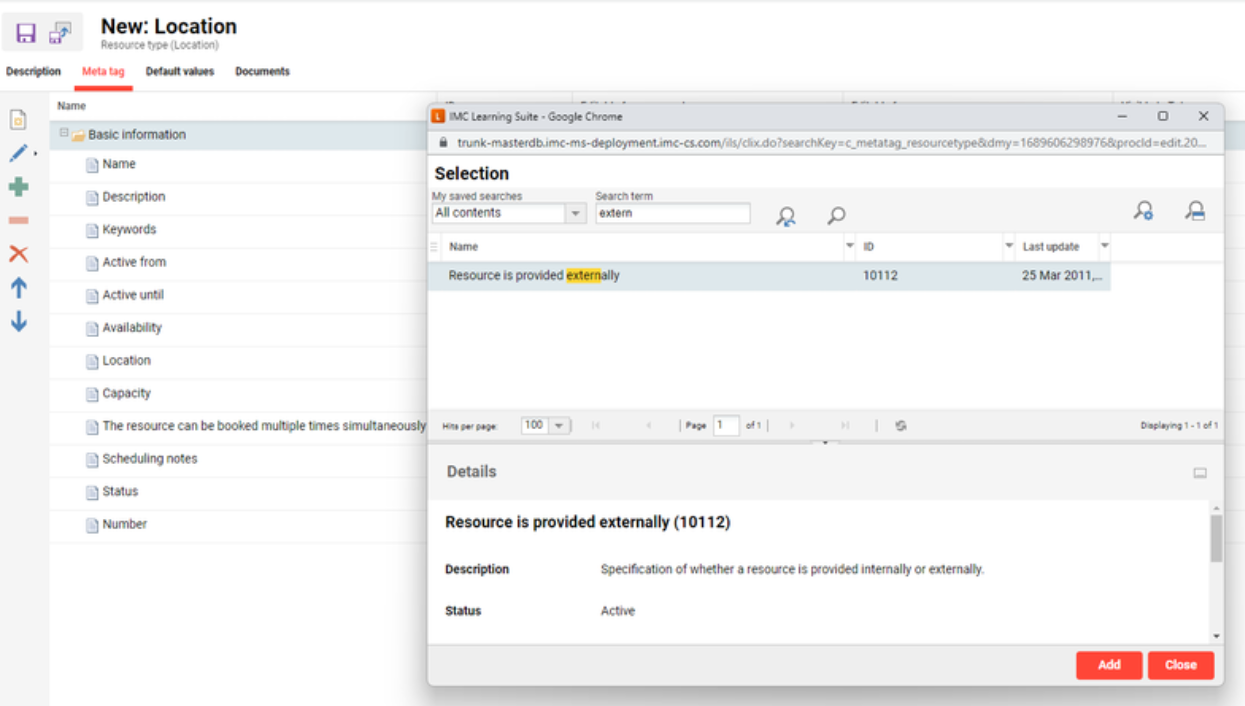
Erstellen Sie einen neuen Ressourcentyp: Lokalität

-
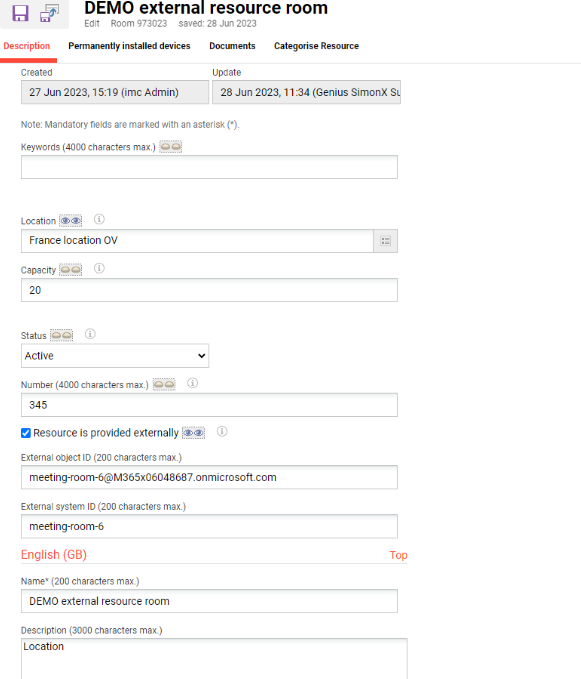
Gehen Sie zum Tab „Metatag“ und fügen Sie den Metatag hinzu: Ressource wird extern bereitgestellt (10112)
-
Wechseln Sie zum Tab „Standardwerte“. Da die Konfiguration der externen Ressource aktiv ist, stehen neben dem Metatag zwei weitere Felder zur Verfügung: „Externe Objekt-ID“ und „Externe System-ID“.
|
Parameter |
Beschreibung |
Beispielwert |
|
Ressource wird extern bereitgestellt (10112) |
Wird verwendet, um anzugeben, ob die Ressource extern bereitgestellt wird oder nicht.
|
checked:
unchecked:
|
|
Externe Objekt-ID |
Dies ist der eindeutige Identifikator der Ressource, die zur Identifizierung in MS Exchange verwendet wird. Räume werden innerhalb einer E-Mail-Adresse identifiziert. Dieses Feld ist obligatorisch, wenn das Metatag 10112 aktiviert ist. Das Feld ist für Ressourcen einzigartig (nur auf Level 1). |
|
|
Externe System-ID |
die externe System-ID |
MS Exchange |
Wichtig: Eine Ressource gilt als extern bereitgestellt, wenn: „Ressource wird extern bereitgestellt (10112)“ aktiviert ist UND die externe Objekt-ID nicht leer ist.
Externe Ressource erstellen und konfigurieren
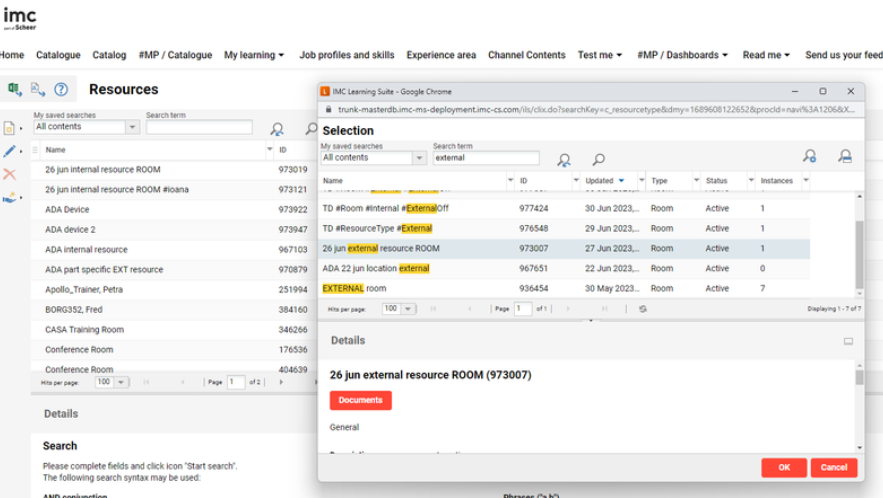
Nachdem Sie den externen Ressourcentyp erstellt haben, erstellen Sie eine neue Ressource dieses Typs.
Externe Ressourcen innerhalb der imc Learning Suite verwenden
Interne Kurse / Lerninhalte
-
Einen Kurs oder ein Medium bearbeiten oder erstellen, für den/das die Registerkarte „Ressourcen“ verfügbar ist
-
Zur Registerkarte „Ressourcen“ navigieren
-
Klicken Sie auf „Button zum Hinzufügen einer externen Ressource“, der nur aktiviert ist, wenn die Konfiguration für die Verwendung externer Ressourcen aktiviert ist. An dieser Stelle werden alle externen Ressourcen angezeigt, die in der imc Learning Suite als extern konfiguriert sind, sortiert nach Verfügbarkeit. Alle Daten werden aus MS Exchange abgerufen.

-
Nach diesem Schritt wird die Ressource in der Kalenderanzeige angezeigt.

-
Es ist möglich, E-Mails für externe Ressourcen zu buchen, zu erstellen, zu bearbeiten und zu versenden, die als eigenständige Ressourcen in der imc Learning Suite gebucht sind. Für alle anderen Ressourcen, die mit der Buchung von Komponenten oder Buchungen außerhalb der imc Learning Suite in Verbindung stehen, ist nur das Versenden von E-Mails zulässig.
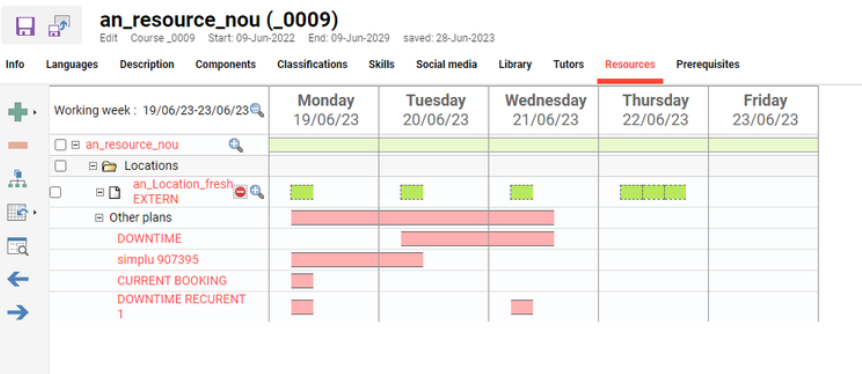
Ressourcenkalender
Die Ansichten kann maximal 1 Monat umfassen.
Buchen, erstellen, bearbeiten und versenden Sie E-Mails für externe Ressourcen, die separat von der imc Learning Suite gebucht werden. Für alle anderen Buchungen, die mit Komponentenbuchungen oder Buchungen außerhalb der imc Learning Suite in Zusammenhang stehen, ist nur das Versenden von E-Mails zulässig.
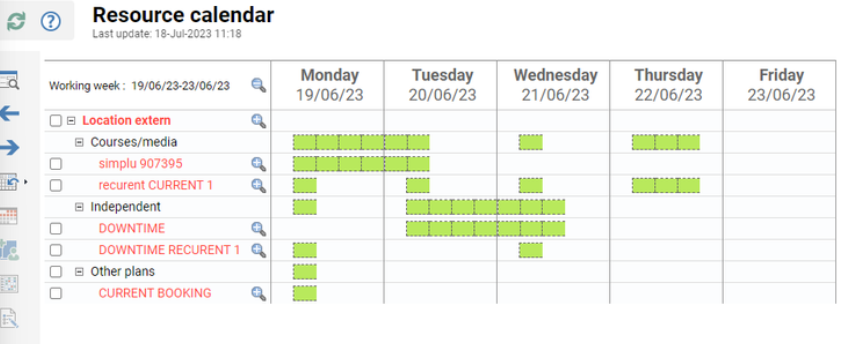
Erläuterung zur Baumansicht:
-
Unabhängig → alle Buchungen aus dem Ressourcenkalender, die mit dem LMS erledigt wurden
-
Kurs/Lerninhalte → Komponentenbuchungen für diese Ressource
-
Andere Planungen → alle Buchungen, die keinen Bezug zum LMS haben